Thursday, September 29, 2016

"Boo to You" Halloween Card

This is a Halloween card I made for my mom.  Every year she always sends everyone a card; every season.  I'm not good at this kind of thing, but this year I'm making her homemade cards for the holidays with my new found love for stamping and making cards.

I started out with Bristol paper for the main page and used Tim Holtz Distressed Inks for the Background colors; Antique Linen and Spiced Marmalade.  I then used the "Boo to You" stamp, which I bought from Michael's like umpteen million years ago, for the greeting. Really you can use any saying or sentiment you'd like. The main stamp comes from Rubbermoon and it is the Scary Neighbors stamp. 

Next is very important because I learned a lesson here.  I used an archival pigment ink and applied heat to dry it faster, then I took my VersaMarker and ran over the windows. My intention was to just emboss the openings in Gold embossing powder.  Guess what? When I poured the embossing powder over the stamped area it took it, so the entire Scary Neighbors stamp had to be embossed.  No worries though; I used a 3D Yellow Gel Pen for the openings and everything worked out fine.

I adhered the main image page to a piece of black cardstock and stuck that to the white card.  Finally, I cut strips from some Halloween paper I have left from the years of scrapbooking and glued that down to each side, trimming the excess off when I was finished.  The last element I added by drawing them in was the bats and the ghost.


Supplies:
3.75" x 4" Bristol Paper
4.125" x 4.25" Black Cardstock
4.25" x 5" Card and Envelope
Scary Neighbors Stamp
"Boo to You" Stamp
Black Archival Pigment Ink Pad
Gold Embossing Powder
3D Yellow Gel Pen
Black Micron Pen
Tim Holtz Antique Linen and Spiced Marmalade Distressed Ink
Halloween paper

Saturday, September 24, 2016

My Cousin; My Friend

I made this card for my cousin that lost her daughter to cancer this year. Brenna was an amazing artist and wonderfully bright person. She was taken at a young adult age,  but she lived and loved without measure. My cousin is like a  sister to me and I just wanted her to know how special she is to me.

I used Bristol paper and stamped the "friendship" image on it.  I colored it in with acrylic paint and embossed the tiny dots and the purple ribbons.

I outlined the image in 3D gel pen and used washi tape to accent the actual card.  It's simple,  but my cousin is a simple person, so I think she will like it.

Thursday, September 22, 2016

Art Display Walls

How do you display your mail art goodies?  I use this cork board on the wall in my craft room and frames.

Tuesday, September 20, 2016

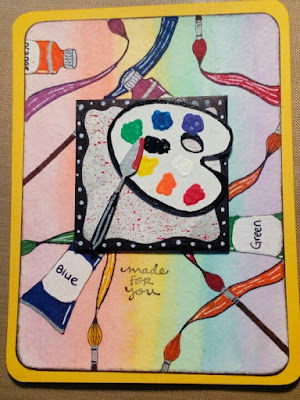
Made for You


I received some awesome stamps in my September/October Rubbermoon Moonmail package and I love them. Yesterday I sat down with my goodies and made this picture. I'm not sure what I will do with it yet. Maybe a card,  maybe something special for someone.  I've never used laser cut images before,  so this was a real treat from Gypsy Soul Laser Cuts.

I washed the watercolor paper and then painted it rainbow colors. Then I stamped the background with the special moonmail stamps and colored in with permanent markers.  I used a silver permanent marker for the brush and paint lids.  I accented with a white gel pen.  For the square, I rolled white acrylic paint over it and then splattered the square with red acrylic paint using a toothbrush.  Then I outlined the square in black permanent marker and added white dots.  I colored the laser cut images with acrylic paint and used a q-tip to dab on rainbow colors of acrylic paint to give it that "pallete being used look".  Once everything was done I adhered the laser cuts to the square, the square to the background, and then finally put it all on a yellow piece of cardstock.  I used my corner rounding punch to give the corners that rounded look.


Supplies:
September/October Rubbermoon Stamps of the Month
2" Precision Cut Matboard Squares
Yellow Card Stock
Watercolor Paper
Watercolors
Acrylic Paint (White and Red)
Permanent ink
White gel pen
Tootbrush
Gypsy Soul Laser Pallete and Paintbrush Cutout

Thursday, September 1, 2016

October 2016 Calendar Picture


I think it was sometime in November or December I received a blank calendar to fill with my own pictures. Well,  it's September and I only have two more months to fill before my calendar is complete.

This is the one I did tonight for October and I really think it turned out cute. I used watercolor paper and painted the background with Peerless Water ColorsTim Holz Distressed Ink,  and his new Distressed Crayons. The black paper in the corners came in my August Moonmail package; it was an iridescent color, but I painted with black acrylic paint. The ghost stamp is from Rubbermoon.Com.  The Halloween stickers are leftovers from my scrapbooking days.

Supplies:
4.5 x 3.5 Watercolor Paper
Ghoul Friends and Happy Halloween stamps
Peerless Watercolors
Distress ink
Permanent marker
Distress crayon
Halloween Stickers
Doily like circle paper

LinkWithin

Related Posts with Thumbnails