Showing posts with label handmade. Show all posts
Saturday, January 13, 2018
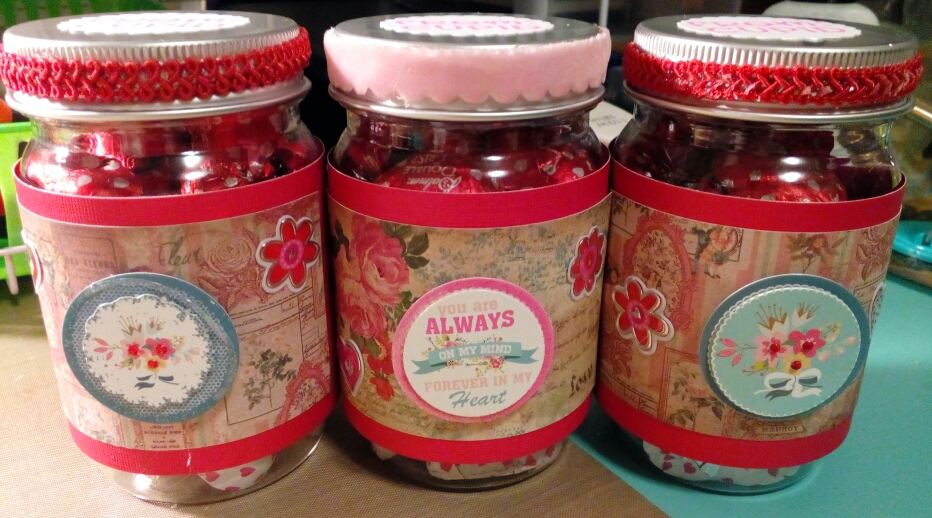
Valentine Treat Jars
I found these plastic "jars" at the dollar tree and picked them up, because I knew if I didn't they wouldn't be around long. I went back tonight after making these and I was right; they didn't have anymore. Oh well, I picked up three different bags of chocolate candy hearts and used those to fill each one.
Sunday, September 3, 2017
Napkin Christmas Cards
Sunday, August 27, 2017
For The Love Of Tea!
I made this card and tag box after watching a tutorial posted by MayMay Made It Crafts! on Youtube and just love making these. This it the third box I’ve made and probably my favorite so far. I used the For the Love of Tea! paper pack from Fabscraps and love the soft, but elegant look and feel of the paper. This particular box is for my Aunt who loves teacups. I thought it was the perfect gift for when she comes to visit my mom in September.
Sunday, August 20, 2017
11 Things You Didn't Know About Me!
I joined this swap in one of my Facebook groups and we had to send our partner 10 different items showing something about our self that the other person may not know. I thought it was going to be really difficult to come up with 10 things, but it wasn't, and I actually came up with 11. To put all of these goodies together to send to my partner I created a bag and loaded it with everything.
Thursday, August 17, 2017
Mini Business Card "Box"
I posted a tutorial on a Mini Business Card holder earlier, but I wanted to make on that was more of a box with a "normal" lid. So, sat down and made this box and really liked how it turned out. There is no Velcro and it closes like a regular box with a flap. I'm really liking how this one turned out. I was able to add 12 cards to this box, which is more than the other box would hold.
Labels:
box,
business,
card,
handmade,
holder,
mini,
mixedmedia,
moo,
rubbermoon
Thursday, August 10, 2017
Everyday Wonderful
Labels:
August,
brown,
card,
die cut,
glitter,
gold,
handmade,
hearts,
owl,
painted,
stamped,
stickles,
Uniquely Unity,
Unity Stamp Co,
watercolor,
wonderful
Tuesday, August 1, 2017
A Friendly Little Package
I've been inspired by Amber (lyriclover810) over at YouTube. I watch her channel faithfully, as she has a ton of ideas for things to make for a craft fair and she is just simply awesome. She makes these cute little mini loaded bags, which were a perfect gift to make for a special friend of mine and possibly make some to sell. I picked up some bags, tags, and dimensional stickers at the local Dollar Tree. Everything else I included in the bag I either made or already had.
Labels:
bag,
craft,
envelopes,
fair,
gift,
handmade,
loaded,
lyriclover810,
mini,
paper,
post it note,
tag
Monday, July 31, 2017
Love Bird Cards
Sunday, July 30, 2017
Spreading a Little Joy
I love, love Unity Stamp Co., they have the greatest stamps. This particular set is called "Fairy Dust" and while I don't normally do cutesy, I really wanted this one as I LOVE fairies.
Friday, July 28, 2017
Do What They Say You Can't Do
I bought four packages of these mini calendar pads from Rubbermoon and couldn't wait to use them. They come in a pack of 6. This is the first of many "tag" calendars I plan on making. The tag is from Unity Stamp Co. and they have a variety of sizes and colors to chose from. The embellishments are just some lovelies that I had lying around and decided to use on this piece.
The bubble background stamp is from the Stamps by Jolande & Marleen kit titled "You can do it". I absolutely love these two designers and their stamp sets.
Labels:
bubbles,
calendar,
die cut,
distress ink,
embossed,
handmade,
manila,
mixed media,
tag,
tim holtz
Thursday, July 27, 2017
Mini Business "Art" Card Holder
Inspired by the July swap in the Rubbermoon Mail Club group. The swap included making mini business cards, otherwise known as "Moo" cards. These cards are 1 1/8" x 2 3/4", which are half the size of a regular business card. While they were a challenge to make I still had fun. Each card is unique and I can't wait for my swap partner to receive the ones I made. I knew that I didn't want to just send them loosely and decided that I would try and make a box that would hold all six of these mini art cards. It took me a couple of tries, but I finally came up with something that works great and can be decorated in a number of ways.
When my swap partner receives her package I will be posting the art cards as well. So stay tuned.
Labels:
box,
business,
card,
handmade,
holder,
mini,
mixedmedia,
moo,
rubbermoon
Tuesday, July 25, 2017
I Have This Desire to Explore
I really like how these two different cards turned out. I'm learning to use the Mirror Image Stamping Tool by Unity Stamp Co. and, needless to say, still have a lot more to learn. Oh, I received my Tim Holtz Stamp platform and, for the life of me, cant' figure out how I ever lived without it. I thought it was way cheaper than another stamp platform and am so in love with it. I'm not sure if I'll ever use another stamp block again.
Labels:
brown,
butterflies,
card,
desire,
distress ink,
explore,
flower,
Gina K Designs,
greeting,
handmade,
july,
Kuretake,
pearl,
pink,
silk,
SMAK,
tim holtz,
twine,
Unity Stamp Co
Wednesday, October 5, 2016
Happy Halloween Cards
One of these cards has already gone out to a special lady, but I'm not saying who or which one.
3.75" x 4" Bristol Paper
4.125" x 4.25" Halloween Scrapbook Paper
4.25" x 5" Card and Envelope
4.125" x 4.25" Halloween Scrapbook Paper
4.25" x 5" Card and Envelope
Rubbermoon Exclusive Stars Stamp
"Happy Halloween" Stamp
Various Pumpkin Stamps
Black Archival Pigment Ink Pad
Black Micron Pen
Tim Holtz Antique Linen and Spiced Marmalade Distressed Ink
Halloween Colored Ribbon
Gold Self Adhesive Gems
3D Circles
"Happy Halloween" Stamp
Various Pumpkin Stamps
Black Archival Pigment Ink Pad
Black Micron Pen
Tim Holtz Antique Linen and Spiced Marmalade Distressed Ink
Halloween Colored Ribbon
Gold Self Adhesive Gems
3D Circles
Thursday, September 29, 2016
"Boo to You" Halloween Card
This is a Halloween card I made for my mom. Every year she always sends everyone a card; every season. I'm not good at this kind of thing, but this year I'm making her homemade cards for the holidays with my new found love for stamping and making cards.
I started out with Bristol paper for the main page and used Tim Holtz Distressed Inks for the Background colors; Antique Linen and Spiced Marmalade. I then used the "Boo to You" stamp, which I bought from Michael's like umpteen million years ago, for the greeting. Really you can use any saying or sentiment you'd like. The main stamp comes from Rubbermoon and it is the Scary Neighbors stamp.
Next is very important because I learned a lesson here. I used an archival pigment ink and applied heat to dry it faster, then I took my VersaMarker and ran over the windows. My intention was to just emboss the openings in Gold embossing powder. Guess what? When I poured the embossing powder over the stamped area it took it, so the entire Scary Neighbors stamp had to be embossed. No worries though; I used a 3D Yellow Gel Pen for the openings and everything worked out fine.
I adhered the main image page to a piece of black cardstock and stuck that to the white card. Finally, I cut strips from some Halloween paper I have left from the years of scrapbooking and glued that down to each side, trimming the excess off when I was finished. The last element I added by drawing them in was the bats and the ghost.
Supplies:
3.75" x 4" Bristol Paper
4.125" x 4.25" Black Cardstock
4.25" x 5" Card and Envelope
3.75" x 4" Bristol Paper
4.125" x 4.25" Black Cardstock
4.25" x 5" Card and Envelope
Scary Neighbors Stamp
"Boo to You" Stamp
Black Archival Pigment Ink Pad
Gold Embossing Powder
3D Yellow Gel Pen
Black Micron Pen
Tim Holtz Antique Linen and Spiced Marmalade Distressed Ink
Halloween paper
"Boo to You" Stamp
Black Archival Pigment Ink Pad
Gold Embossing Powder
3D Yellow Gel Pen
Black Micron Pen
Tim Holtz Antique Linen and Spiced Marmalade Distressed Ink
Halloween paper
Monday, January 7, 2013
Flat Sprial Beadwork with Millefiori Beads
I knew this was going to be tricky, but I didn't realize how tricky. I made two bracelets last night using my favorite glass beads, which are Millefiori beads. I love their colors and how beautiful they look when making jewelry pieces.
On the first bracelet I used a Flat Sprial bead stitch, which I had to adapt for the size of the beads. This bracelet was all about the color red that needed to pop out of the clear Millefiori bead. Well, I accomplished that, but I did not like going thru two of the beads and will be redoing that bracelet today.
The second bracelet was using an outstanding green Millefiori bead and this time I went thru only one bead. It came out so much better than the first one and that is why I decided to redo the first one.
I am now selling on a wonderfully fun and exciting new online shop platform called TheCraftStar. Unlike the bigger guy "E", it is more personal and the people who operate it have been wonderful. I am still using the same shop name "Ivonnardona's Creations", so come on by and check us out.
I'm running a Valentine's Sale offering 15% off anything in my shop; just use VALENTINE15 as the coupon code.
Wednesday, December 19, 2012
Tin Can Lid Ornaments
Wondering what to do with those tin can lids after you take them off of the cans? I wondered the same thing as well and came up with these Christmas ornaments. I would suggest running out and buying a smooth edge can opener, so you or someone handling the ornaments doesn't get cut.
First, I primed each lid with Gesso, which you can find in any Craft or Art store. I let this dry and then broke out my acrylic paints. I chose a paint that would compliment the colors in the die-cuts that I used for the main piece of each ornament. I gave each lid a good coating and then let that dry over night.
Next, I broke out my Cricut machine and cut some circles out of scrapbook paper that fit just inside each lid. Since my Cricut only cuts out certain sizes I went ahead and cut out larger circles and then trimmed them until they fit. I then glued each circle onto the colored side of the lid that it went with and let the dry for about an hour.
Finally, I took the Christmas die-cuts and put clear glue dots around the centers and then centered them on each lid. Some of the die-cuts were bigger than the circle, but I like that. I didn't want to cut the edges, but that is your preference.
Here are the finished ornaments:
Have fun making your own and Happy Holidays!
Wednesday, December 12, 2012
Etsy Treasuries I'm In
Yay, I've been back selling on Etsy for over a week now and have been included in two Etsy Treasuries. The first one is The Frosty Blues of December, which showcased my Blue Millefiori Chip Bead Bangle Bracelet. The second one happened today and it is Orange Dreams., which showcased my Orange Millefiori Chip Bead Bangle Bracelet. They are both brilliant and beautiful treasuries and you definitely should go check them out.
While you're there, please stop by and check out my Etsy shop Ivonnardona's Creations. I am offering FREE SHIPPING through the end of the year and a 10% discount on all items. Just use coupon code XMASKISS10 to get 10% off your entire order.
Friday, December 7, 2012
Lots of Jewelry Going Back Up For Sale!
I'm exhausted, but I hope it will be well worth it. I have been busy posting my jewelry back up for sell in my Etsy shop. I have also created a new shop over at TheCraftStar and am posting the same items in hopes to start moving them out of my inventory and into someone's hands.
I truly love creating and today I made a couple pair of earrings and fixed a necklace. I forgot how to wrap wire, but quickly figured out something new that I tried and it worked out rather well.
| Yellow Jade Dangle Earrings |
| Leopard Jasper Dangle Earrings |
Wednesday, December 5, 2012
Burning Impression Necklace
I am getting back into making and selling jewelry. My big project for this week is going through the jewelry I have made and revamping some of them. I've posted four items so far this week and this is one of my favorites. I used a Peyote stitch for the bottom portion of the necklace and then beaded the through the silver cones and added acrylic beads and glass seed beads. I call this one "Burning Impression" because of the beautiful red, orange, and brown colors in the piece. I am back selling in my Etsy shop and now have a new shop with TheCraftStar.
For the month of December I am offering a 10% discount on all orders; just use coupon code XMASKISS10.
Rolled Taco Casserole
Inspired by Pinterest
by all of the wonderful recipes I've been seeing lately; I decided to
post a favorite of mine. This has been made in my family for as long as
I can remember and it is always a favorite. I also make it without the
rolled tacos on occasion, when I'm feeling a little lazy. I make my own
rolled tacos one night and then
save the appropriate amount to make this the next day. Yields: About 6 to 12 Servings.
Subscribe to:
Posts (Atom)


