Saturday, January 13, 2018

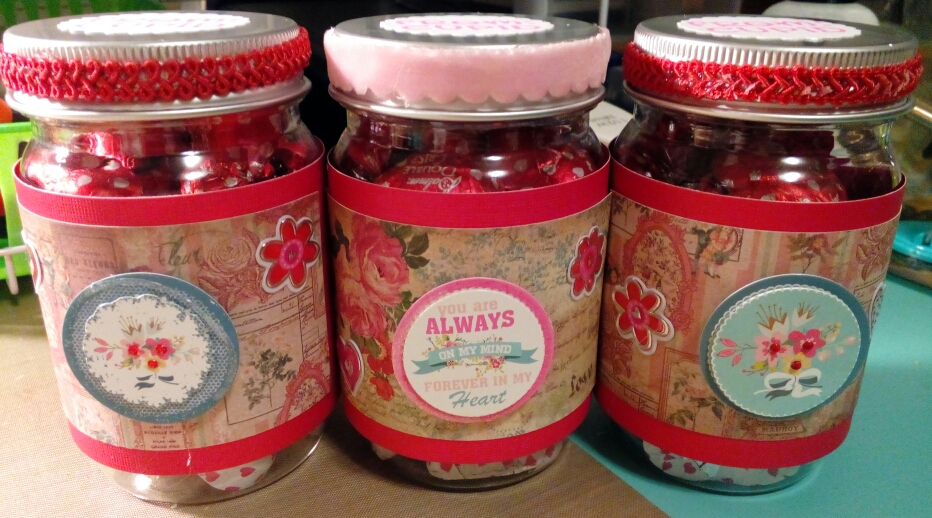
Valentine Treat Jars


I found these plastic "jars" at the dollar tree and picked them up, because I knew if I didn't they wouldn't be around long. I went back tonight after making these and I was right; they didn't have anymore. Oh well, I picked up three different bags of chocolate candy hearts and used those to fill each one.


Tuesday, October 3, 2017

Washi Tape Storage Options!

I just read an article of how a crafter used cookie trays to store her washi tape.  Don't get me wrong I love to recycle just as much as the next person, but I have found that sometimes the recycled containers just don't hold up and then there is the whole cleaning it, drying it, and so on.  So, this post is about some wonderful products that can be used to store your washi tape and are reasonably priced.

Sunday, September 3, 2017

Napkin Christmas Cards


I've been following Tracy with GiftBasketAppeal over on her YouTube channel and she used napkins to make some tags and I was like, "oh yeah I have a pile of napkins just sitting here that I've never used. I should make some cards."

Sunday, August 27, 2017

For The Love Of Tea!


I made this card and tag box after watching a tutorial posted by MayMay Made It Crafts! on Youtube and just love making these. This it the third box I’ve made and probably my favorite so far.  I used the For the Love of Tea! paper pack from Fabscraps and love the soft, but elegant look and feel of the paper. This particular box is for my Aunt who loves teacups. I thought it was the perfect gift for when she comes to visit my mom in September.  

Sunday, August 20, 2017

11 Things You Didn't Know About Me!


I joined this swap in one of my Facebook groups and we had to send our partner 10 different items showing something about our self that the other person may not know.  I thought it was going to be really difficult to come up with 10 things, but it wasn't, and I actually came up with 11. To put all of these goodies together to send to my partner I created a bag and loaded it with everything.

Thursday, August 17, 2017

Mini Business Card "Box"


I posted a tutorial on a Mini Business Card holder earlier, but I wanted to make on that was more of a box with a "normal" lid.  So, sat down and made this box and really liked how it turned out. There is no Velcro and it closes like a regular box with a flap. I'm really liking how this one turned out.  I was able to add 12 cards to this box, which is more than the other box would hold.

Tuesday, August 1, 2017

A Friendly Little Package


I've been inspired by Amber (lyriclover810) over at YouTube. I watch her channel faithfully, as she has a ton of ideas for things to make for a craft fair and she is just simply awesome.  She makes these cute little mini loaded bags, which were a perfect gift to make for a special friend of mine and possibly make some to sell.  I picked up some bags, tags, and dimensional stickers at the local Dollar Tree.  Everything else I included in the bag I either made or already had.

Monday, July 31, 2017

Love Bird Cards


These two cards were made using my Gelli Plate and the "Love Bird" stencil from iStencils.  I first laid down metallic acrylic and regular acrylic paint on the Gelli Plate. Next, I laid the stencil over the stencil, rubbed, and then lifted the paper (2nd card). Then I removed the stencil and laid another piece of paper over what was left on the plate to get what is called a "ghost" print (1st card).

Sunday, July 30, 2017

Spreading a Little Joy

I love, love Unity Stamp Co., they have the greatest stamps.  This particular set is called "Fairy Dust" and while I don't normally do cutesy, I really wanted this one as I LOVE fairies.

Saturday, July 29, 2017

Relax It's Just A Tea Bag Pocket Favor


I made these cute little tea pocket favors for my swap partner from the Rubbermoon moonmail club.  The stamp used is from the July moonmail monthly club subscription.  I LOVE the tutorials from lyriclover810 over at Youtube.  I followed her Tea Bag Pocket Favor tutorial for making these, so need for me to post one here.


Friday, July 28, 2017

Do What They Say You Can't Do


I bought four packages of these mini calendar pads from Rubbermoon and couldn't wait to use them. They come in a pack of 6.  This is the first of many "tag" calendars I plan on making.  The tag is from Unity Stamp Co. and they have a variety of sizes and colors to chose from.  The embellishments are just some lovelies that I had lying around and decided to use on this piece.

The bubble background stamp is from the Stamps by Jolande & Marleen kit titled "You can do it".  I absolutely love these two designers and their stamp sets.

Thursday, July 27, 2017

Mini Business "Art" Card Holder


Inspired by the July swap in the Rubbermoon Mail Club group.  The swap included making mini business cards, otherwise known as "Moo" cards.  These cards are 1 1/8" x 2 3/4", which are half the size of a regular business card. While they were a challenge to make I still had fun.  Each card is unique and I can't wait for my swap partner to receive the ones I made.  I knew that I didn't want to just send them loosely and decided that I would try and make a box that would hold all six of these mini art cards.  It took me a couple of tries, but I finally came up with something that works great and can be decorated in a number of ways.

When my swap partner receives her package I will be posting the art cards as well.  So stay tuned.

Tuesday, July 25, 2017

I Have This Desire to Explore


I really like how these two different cards turned out.  I'm learning to use the Mirror Image Stamping Tool by Unity Stamp Co. and, needless to say, still have a lot more to learn.  Oh, I received my Tim Holtz Stamp platform and, for the life of me, cant' figure out how I ever lived without it.  I thought it was way cheaper than another stamp platform and am so in love with it.  I'm not sure if I'll ever use another stamp block again.

Thursday, October 27, 2016

Stenciled ATCs - Sweet William, Wild Thing, and Happy Cat

I've been making Artist Trading Cards (ATC) since 2009 and was an active member of ATCs for All. I haven't been on the site in two years.  I recently joined a FaceBook group that trades ATCs and signed up for StencilGirl's monthly stencil club.  The point? you might ask is that I never really thought I could use stencils. I mean I'm just learning how to "layer" paint.  Well, I did it, I went and bought me six more stencils and created the following ATCs. Hah, layering isn't so bad.  I really liked how they turned out.  I even picked up my copy of Drawing Lab For Mixed-Media Artists by Carla Sonheim and drew the characters for these cards.  As I haven't drawn in over two years it was kind of awkward, but as Carla points out in her book Steven Pressfield states in his book titled The War of Art "There is no such thing as a fearless warrior or a dread-free artist."

Meet Sweet William the frog:


Wild Thing Giraffe:


Finally, Happy Cat:


These are all ATC size, which is 2.5" x 3.5", and created on Bristol paper.  I rolled paint for the background, dabbed paint through stencils, tore vintage book pages, and colored in each image.  I also used stamps, found words in print, and sticker words for the phrases. Lastly, as I always do, I used my ink pads to create a soft border around each one.

My final point is this: Don't be afraid to try something new and uncomfortable. You can't succeed if you never try.

Tuesday, October 25, 2016

Mini Stenciled Journals

As promised I am posting the video for making what Gwen refers to as "Mini Stenciled Junque Journals".  When I saw her video I had to make some. I love recycling mailers, cereal boxes, etc. so this was right up my alley.  I love her details and am going to have to get some of the metallic paint pens; I tried using Metallic Permanent Markers, but did not get the same effect. I'm not going to bore you with the details on how to make these journals as Gwen does a fantastic job of explaining it.

What I did differently to make them my own:

1. Collaged paper with a Matte Gel Medium.
2. Used six strands of Embroidery Floss to hold the pages in place and to secure the journal closed with the button.
3. The Blue Journal has lots of dots. I used a White Sharpie Paint Pen and the end of a paint brush to make all of those dots.
4. I used large buttons instead of twine.  I poked two holes and secured the buttons with the embroidery floss.  The blue journal button securing was a little more involved as the button has a loop and not holes.

The stencils used are unique to the Monthly StencilGirl Club members, so you can't purchase them unless you are a member. However, that doesn't mean you can't use some of the awesome stencils they have at StencilGirl Products.

Her video is here:

Gwen's Gems: Mini Stenciled Junque Journals (I changed the link to go where the actual video is located. Sorry for any confusion.)

Red Mini Journal


Supplies Used:
Postal Mailer
Bristol Paper
Oriental Rice Paper (Four different types and patterns)
Gel Medium Matte
Embroidery Thread
Large Button
White Gesso
Gold Metallic Permanent Marker
StencilGirl October 2016 StencilClub 4"x4" Stencil


Green Mini Journal


I stamped the two Rubbermoon stamps directly on with embossing ink and used Gold embossing ink.

Supplies Used:
Postal Mailer
Oriental Rice Paper (Four different types and patterns)
Gel Medium Matte
Embroidery Thread
Large Button
Acrylic Paints
Gold Metallic Permanent Marker
Gold Embossing Powder
Rubbermoon 7-Petal Flower Stamp
Rubbermoon Stampstracts - Petal Pusher Stamp
StencilGirl October 2016 StencilClub 9"x12" Stencil
StencilGirl October 2016 StencilClub 4"x4" Stencil

Blue Mini Journal


I stamped the "Beautiful Mistakes" sentiment after using Tim Holtz's Distressed Inks on a piece of Bristol Paper. Then I used an embossing ink pad around the edges and added Silver Embossing Ink.

Supplies Used:
Postal Mailer
Oriental Rice Paper (Four different types and patterns)
Gel Medium Matte
Embroidery Thread
Large Silver Button
Acrylic Paints
Silver Metallic Permanent Marker
Silver Embossing Powder
Tim Holtz Distressed Ink - Black Soot
Tim Holtz Distressed Ink - Broken China
White Sharpie Paint Pen
Rubbermoon Moonmail Exclusive "Scattered Stars" Stamp
Rubbermoon Mindy Lacefield's Beautiful Mistakes Stamp
StencilGirl October 2016 StencilClub 6"x6" Stencil
StencilGirl October 2016 StencilClub 4"x4" Stencil


Wednesday, October 5, 2016

Happy Halloween Cards

I forgot how much fun making handmade cards was until I joined an online group that sends cards for Random Acts of Mail, or I like to say Random Acts of Kindness.  I used Tim Holtz Distressed Mini Ink Pads Antique Linen and Spiced Marmalade for the background layering one over the other. I really like the effect these inks have on paper.  I stamped "Happy Halloween" in orange and randomly outlined it with my Black Micron Pen.  Next I used my Rubbermoon Exclusive stars stamp and stamped each background in the center. The pumpkins are stamped on white Bristol paper and painted in with acrylic ink and a white gel pen.  These are Halloween stamps I picked up from Michael's in their dollar section a few years back.  I used 3D circles for mounting the pumpkins on the background.  I cut out some Halloween colored paper and adhered the main image to the paper. I bought some Halloween colored ribbons and self adhesive gems to add some classy touches to each card.

One of these cards has already gone out to a special lady, but I'm not saying who or which one.


Supplies:
3.75" x 4" Bristol Paper
4.125" x 4.25" Halloween Scrapbook Paper
4.25" x 5" Card and Envelope
Rubbermoon Exclusive Stars Stamp
"Happy Halloween" Stamp
Various Pumpkin Stamps
Black Archival Pigment Ink Pad
Black Micron Pen
Tim Holtz Antique Linen and Spiced Marmalade Distressed Ink
Halloween Colored Ribbon
Gold Self Adhesive Gems
3D Circles

LinkWithin

Related Posts with Thumbnails